Linux在VSCode中使用Clang、CMake编译与调试的简单配置
一、环境准备
以下以ubuntu 24.04LTS为例,会遵从默认配置,尽可能简单。
其他需求例如:使用libc++而不是libstdc++;更改编译输出的目录;clangd配置等会放在最后。
1.1 CMake安装
sudo apt install cmake
1.2 clang安装
sudo apt install clang
1.3 可选部分
clangd为代码编辑提供智能补全、代码导航和错误检查等功能
clang-tidy可以在编写代码时实时提供静态分析检查和代码改进建议
clang-format代码格式化和风格调整
sudo apt install clangd
sudo apt install clang-tidy
sudo apt install clang-format
二、此阶段所需的VSCode扩展安装
| 名称 | 扩展ID | 备注 |
|---|---|---|
| C/C++ Extension Pack | ms-vscode.cpptools-extension-pack | 用于后续CMake调试代码 |
| CMake Tools | ms-vscode.cmake-tools | CMake插件 |
三、从单文件开始
3.1 目录结构
project/
├── src/
│ └── main.cpp
├── CMakeLists.txt # CMake 主配置文件
└── CMakePresets.json # CMake 预设文件
3.2 main.cpp
#include 3.3 CMakeLists.txt
# CMake的最低版本要求
cmake_minimum_required(VERSION 3.10)

# 项目名字,这里用的是CMakeDemo
project(CMakeDemo)

# 指定C和C++使用 Clang 编译器
set(CMAKE_C_COMPILER clang)
set(CMAKE_CXX_COMPILER clang++)

# 第一个参数是可执行文件的名称,后面的参数是源文件路径
add_executable(main src/main.cpp)
3.4 CMakePresets.json
CMake的预设文件,指定编译器路径、生成路径、测试路径等
下面给出三个预设:配置预设configurePresets、构建预设buildPresets和测试预设testPresets。其中指定后两个直接使用配置预设。
⚠️ 注意:检查下面的路径/usr/bin/clang、/usr/bin/clang++是否存在
{
    "version": 8,
    "configurePresets": [
        {
            "name": "clang",
            "displayName": "Clang 18.1.3 x86_64-pc-linux-gnu",
            "description": "正在使用编译器: C = /usr/bin/clang, CXX = /usr/bin/clang++",
            "binaryDir": "${sourceDir}/out/build/${presetName}",
            "cacheVariables": {
                "CMAKE_INSTALL_PREFIX": "${sourceDir}/out/install/${presetName}",
                "CMAKE_C_COMPILER": "/usr/bin/clang",
                "CMAKE_CXX_COMPILER": "/usr/bin/clang++",
                "CMAKE_BUILD_TYPE": "Debug"
            }
        }
    ],
    "buildPresets": [
        {
            "name": "clang",
            "configurePreset": "clang"
        }
    ],
    "testPresets": [
        {
            "name": "clang",
            "configurePreset": "clang"
        }
    ]
}
⚠️ 注意:上面的完成之后要重启VSCode
3.5 启动CMake扩展,运行代码
打开左侧的cmake工具栏,选择配置即可使用CMakePresets.json中的预设
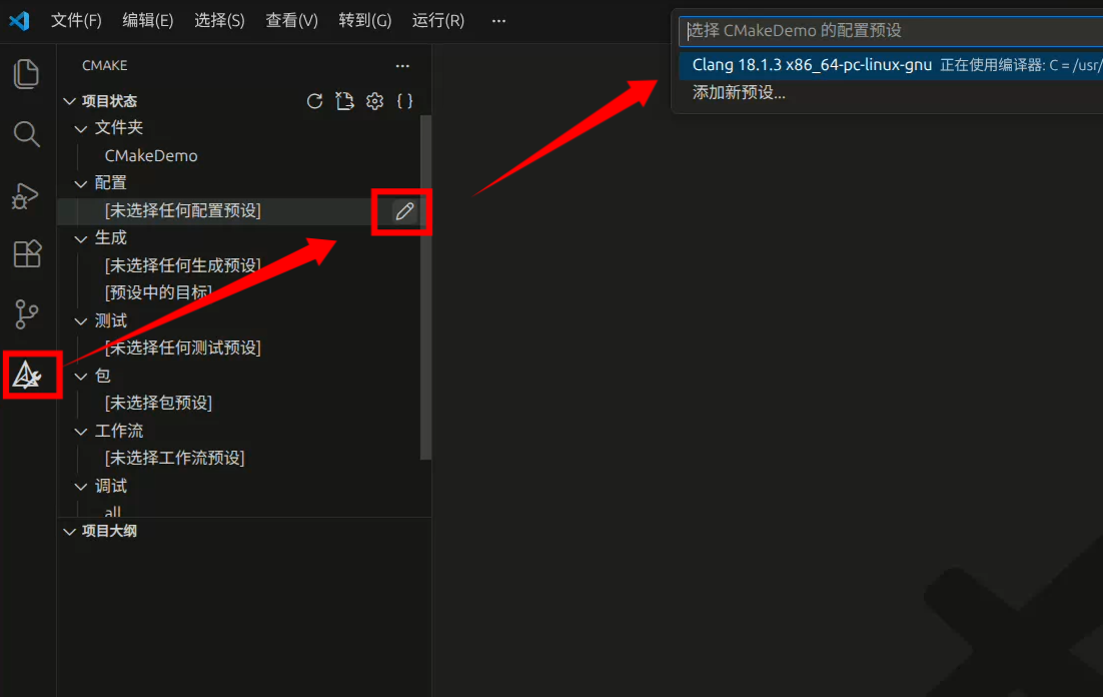
选择配置后,点击底部运行按钮即可运行

设置好断点后可以点击旁边的debug进行调试
四、多个文件编译成一个可执行文件
4.1 源代码
4.1.1 目录结构
project/
├── src/ # 源代码目录
│ ├── qsort.cpp # 快速排序的主程序
│ └── data.cpp # 数据实现
├── include/ # 公共头文件目录
│ └── data.h # 数据头文件(公开接口)
├── CMakeLists.txt
└── CMakePresets.json
提示:这里为了简单,使用了相对路径
../include/data.h引入头文件,绝对路径的写法放在文末
4.1.2 src/qsort.cpp 快速排序
// 快速排序
#include 4.1.3 src/data.cpp 数据实现以及打印
#include "../include/data.h"
#include 4.1.4 include/data.h 数据头文件
#pragma once

extern int numbers[100];
void printNumbers();
4.1.5 CMakeLists.txt
具体不同为
add_executable(qsort src/qsort.cpp src/data.cpp)
# CMake的最低版本要求
cmake_minimum_required(VERSION 3.10)

# 项目名字,这里用的是CMakeDemo
project(CMakeDemo)

# 指定C和C++使用 Clang 编译器
set(CMAKE_C_COMPILER clang)
set(CMAKE_CXX_COMPILER clang++)

# 第一个参数是可执行文件的名称,后面的参数是源文件路径
add_executable(qsort src/qsort.cpp src/data.cpp)
4.1.6 其他文件
CMakePresets.json与3.3的相同
4.2 不同点
具体不同
add_executable(qsort src/qsort.cpp src/data.cpp),除了名称不同外,还要加上src/data.cpp
⚠️ 警告:add_executable(qsort src/qsort.cpp src/data.cpp)中的两个源代码文件有且只能有一个main函数
五、多个文件编译成多个可执行文件
5.1 源代码
5.1.1 目录结构
project/
├── src/ # 源代码目录
│ ├── qsort.cpp # 快速排序的主程序
│ ├── bubble_sort.cpp # 冒泡排序的主程序
│ └── data.cpp # 数据实现
├── include/ # 公共头文件目录
│ └── data.h # 数据头文件(公开接口)
├── CMakeLists.txt
└── CMakePresets.json
5.1.2 src/bubble_sort.cpp 冒泡排序
// 冒泡排序

#include "../include/data.h"

int main() {
    const int len = sizeof(numbers) / sizeof(numbers[0]);
    for (int i = len-1; i > 0; i--) {
        bool isSwapped = false;
        for (int j = 0 ; j < i; ++j) {
            if (numbers[j+1] < numbers [j]) {
                int temp = numbers[j];
                numbers[j] = numbers[j+1];
                numbers[j+1] = temp;
                isSwapped = true;
            }
        }
        if (!isSwapped) break;
    }

    printNumbers();
}
5.1.3 CMakeLists.txt
# CMake的最低版本要求
cmake_minimum_required(VERSION 3.10)

# 项目名字,这里用的是CMakeDemo
project(CMakeDemo)

# 指定C和C++使用 Clang 编译器
set(CMAKE_C_COMPILER clang)
set(CMAKE_CXX_COMPILER clang++)

# 第一个参数是可执行文件的名称,后面的参数是源文件路径
add_executable(qsort src/qsort.cpp src/data.cpp)
add_executable(bubble_sort src/bubble_sort.cpp src/data.cpp)
5.2 如何执行
如果依照4的步骤会依旧执行快速排序的代码,而不是冒泡排序。
想要更改可以在CMake插件面板的调试或者启动下修改需要执行的目标,接下来与3.5相同
六、自定义配置
6.1 使用Clangd插件
⚠️ 警告:确保已经安装了clangd,clangd扩展会提示关闭c/c++扩展的智能提示
下面的配置文件都放在根目录
6.1.1 clang-tidy 文件检查 (可选)
---
Checks: >
    clang-analyzer-*,
    bugprone-*,
    readability-*,
    -readability-identifier-length,
    performance-*,
    cppcoreguidelines-*
HeaderFilterRegex: '*'
FormatStyle: file
6.1.2 .clangd
这个用途放在具体情况进行说明,例如6.2.5
6.1.3 .clang-format
用于格式化,具体含义省略。写错了配置会导致配置文件不可用
BasedOnStyle: Google
IndentWidth: 4
AllowShortFunctionsOnASingleLine: All
BreakBeforeBraces: Attach
SpaceBeforeParens: ControlStatements
AlignArrayOfStructures: Left
6.2 使用libc++而不是libstdc++
6.2.1 安装库文件
如果你安装clang时没有指定clang的版本,安装的是发行版默认的版本,例如ubuntu 24.04默认clang版本是18
那么可以不指定版本
sudo apt install libc++-dev libc++abi-dev
如果指定了版本,首先要确认clang的版本
⚠️ 警告:指定版本的可能不是clang++而是clang++-20之类
clang++ --version
如果clang++的版本是20
sudo apt install libc++-20-dev libc++abi-20-dev
可能需要处理clang-20名称与默认clang不同的问题
6.2.2 修改CMakeLists.txt
添加set(CMAKE_CXX_FLAGS "${CMAKE_CXX_FLAGS} -stdlib=libc++")
# CMake的最低版本要求
cmake_minimum_required(VERSION 3.10)

# 项目名字,这里用的是CMakeDemo
project(CMakeDemo)

# 指定C和C++使用 Clang 编译器
set(CMAKE_C_COMPILER clang)
set(CMAKE_CXX_COMPILER clang++)
# 使用 libc++
set(CMAKE_CXX_FLAGS "${CMAKE_CXX_FLAGS} -stdlib=libc++")

# 第一个参数是可执行文件的名称,后面的参数是源文件路径
add_executable(qsort src/qsort.cpp src/data.cpp)
add_executable(bubble_sort src/bubble_sort.cpp src/data.cpp)
6.2.3 检测的方法
简单的检测文件
如果放到了根目录,并且文件名是detect.cpp,那么需要在CMakeLists.txt加上add_executable(detect detect.cpp)
#include 6.2.4 检测结果示例
Choose detection mode:
1. Quick detection
2. Detailed information
Your choice (1 or 2): 2
=== C++ Runtime and Compiler Detection ===

3. Compiler Information:
   - Compiler: Clang 20.1.2
   - C++ Standard: C++17

2. C++ Standard Library:
   - Library: libc++ 20.1.0
   - Full version code: 200100

3. Platform Information:
   - Platform: Linux
   - Architecture: x86_64

4. Feature Detection:
   - Thread-safe static init: C++11
   - Initializer lists: C++11
   - Range-based for: C++11
6.2.5 Clangd仍然使用的是libstdc++,编辑器导航的源代码也是libstdc++
需要修改.clangd
下面的
out/build/clang来自于CMakePresets.json中的"binaryDir": "${sourceDir}/out/build/${presetName}"
如果CMakePresets.json中configurePresets的presetName不是clang,那么out/build/clang也需要修改
---
# C++配置
If:
  PathMatch: .*.(cpp|cxx|cc|hpp|hxx)$
CompileFlags:
  CompilationDatabase: out/build/clang
  Add:
    - -stdlib=libc++
    - -std=c++20
如果按照上面配置了
CompilationDatabase: out/build/clang,还需要CMake导出编译命令
在CMakeList.txt加上set(CMAKE_EXPORT_COMPILE_COMMANDS ON)
# CMake的最低版本要求
cmake_minimum_required(VERSION 3.10)

# 项目名字,这里用的是CMakeDemo
project(CMakeDemo)

# 指定C和C++使用 Clang 编译器
set(CMAKE_C_COMPILER clang)
set(CMAKE_CXX_COMPILER clang++)
# 使用 libc++
set(CMAKE_CXX_FLAGS "${CMAKE_CXX_FLAGS} -stdlib=libc++")
# 导出编译命令
set(CMAKE_EXPORT_COMPILE_COMMANDS ON)

# 第一个参数是可执行文件的名称,后面的参数是源文件路径
add_executable(qsort src/qsort.cpp src/data.cpp)
add_executable(bubble_sort src/bubble_sort.cpp src/data.cpp)
add_executable(detect detect.cpp)