linux 安装elasticsearch并设置密码+logstash
一、安装前的配置
1.1、创建普通用户
由于ES禁止使用root用户启动,需要创建一个普通用户来运行ES
创建一个组
[root@iZku601qck4zuy4x4j6ig8Z~]# groupadd elasticsearch创建一个普通用户并配置密码
[root@iZku601qck4zuy4x4j6ig8Z~]# useradd esroot
[root@iZku601qck4zuy4x4j6ig8Z~]# passwd esroot
Changing password for user esroot.
New password:
BAD PASSWORD: The password contains the user name in some form
Retype new password:
passwd: all authentication tokens updated successfully.
将新用户添加到elasticsearch用户组
[root@iZku601qck4zuy4x4j6ig8Z~]# usermod -G elasticsearch esroot给esroot用户设置sudo权限
在 在root ALL=(ALL) ALL一行下面添加
esroot ALL=(ALL) ALL[root@iZku601qck4zuy4x4j6ig8Z /]# visudo
## Allow root to run any commands anywhere
root ALL=(ALL) ALL
esroot ALL=(ALL) ALL
1.2、调整文件描述符数量和虚拟内存
[root@iZku601qck4zuy4x4j6ig8Z/]# ulimit -n 65536
[root@iZku601qck4zuy4x4j6ig8Z/]# ulimit -u 4096
1.3、设置shell会话的资源限制(软限制和硬限制)
在文本最后添加下面两段代码
vi /etc/security/limits.conf
shcms soft nofile 65536
shcms hard nofile 65536
1.4、增加虚拟内存的设置
添加vm.max_map_count=262144
[root@iZku601qck4zuy4x4j6ig8Z /]# vi /etc/sysctl.conf
vm.swappiness = 0
kernel.sysrq = 1
vm.max_map_count=262144

net.ipv4.neigh.default.gc_stale_time = 120

# see details in https://help.aliyun.com/knowledge_detail/39428.html
net.ipv4.conf.all.rp_filter = 0
net.ipv4.conf.default.rp_filter = 0
net.ipv4.conf.default.arp_announce = 2
net.ipv4.conf.lo.arp_announce = 2
net.ipv4.conf.all.arp_announce = 2

# see details in https://help.aliyun.com/knowledge_detail/41334.html
net.ipv4.tcp_max_tw_buckets = 5000
net.ipv4.tcp_syncookies = 1
net.ipv4.tcp_max_syn_backlog = 1024
net.ipv4.tcp_synack_retries = 2
net.ipv4.tcp_slow_start_after_idle = 0
1.5、使虚拟内存配置立即生效
[root@iZku601qck4zuy4x4j6ig8Z /]# sysctl -p
vm.swappiness = 0
kernel.sysrq = 1
vm.max_map_count = 262144
net.ipv4.neigh.default.gc_stale_time = 120
net.ipv4.conf.all.rp_filter = 0
net.ipv4.conf.default.rp_filter = 0
net.ipv4.conf.default.arp_announce = 2
net.ipv4.conf.lo.arp_announce = 2
net.ipv4.conf.all.arp_announce = 2
net.ipv4.tcp_max_tw_buckets = 5000
net.ipv4.tcp_syncookies = 1
net.ipv4.tcp_max_syn_backlog = 1024
net.ipv4.tcp_synack_retries = 2
net.ipv4.tcp_slow_start_after_idle = 0
二、ES安装
2.1、下载与解压
下载地址:
Elasticsearch 7.12.1 | Elastic
解压
[root@iZku601qck4zuy4x4j6ig8Z software]# mkdir /opt/es
[root@iZku601qck4zuy4x4j6ig8Z software]# tar -zxvf elasticsearch-7.12.1-linux-x86_64.tar.gz -C /opt/es/
2.2、配置文件修改
需要先切换到esroot用户
[root@iZku601qck4zuy4x4j6ig8Z /]$ su - esroot
[esroot@iZku601qck4zuy4x4j6ig8Z /]$ vi elasticsearch.yml
# 启动地址,如果不配置,只能本地访问
network.host: 0.0.0.0
# 节点名称
node.name: node-name
# 节点列表
discovery.seed_hosts: ["127.0.0.1"]
# 初始化时master节点的选举列表
cluster.initial_master_nodes: [ "node-name" ]
# 集群名称
cluster.name: cluster-name
# 对外提供服务的端口
http.port: 9200
# 内部服务端口
transport.port: 9300
# 跨域支持
http.cors.enabled: true
# 跨域访问允许的域名地址(正则)
http.cors.allow-origin: /.*/2.3、启动ES服务
[esroot@iZku601qck4zuy4x4j6ig8Z/]$ su esroot
[esroot@iZku601qck4zuy4x4j6ig8Z/]$ cd /opt/es/elasticsearch-7.12.1/bin
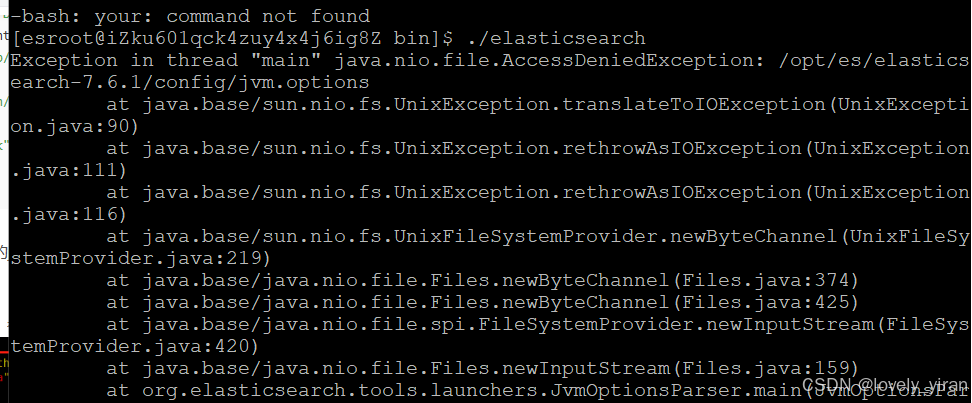
[esroot@iZku601qck4zuy4x4j6ig8Z/]$ ./elasticsearch
#上边的启动方式关闭窗口会关掉服务,修改为nhup启动
[esroot@iZku601qck4zuy4x4j6ig8Z bin]$ nohup ./elasticsearch &2.4、启动报java 版本错误
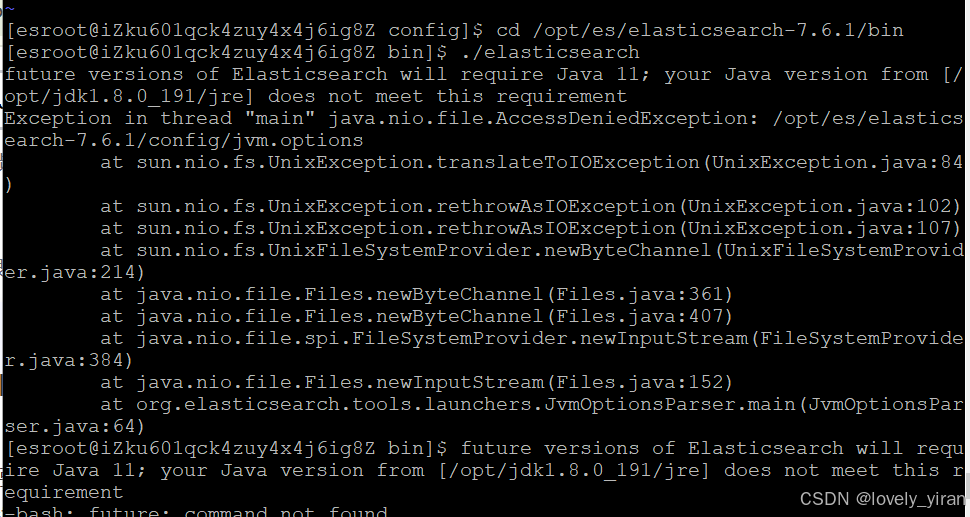
ES的某些版本对JDK有特定要求,需要确保系统中JDK的版本与ES版本兼容。ES 7.x以上通常内置了JDK环境,不需要本地JDK支持。如果需要指定JDK版本,可以在ES的bin目录中修改elasticsearch脚本,设置正确的JAVA_HOME路径。在/elasticsearch/bin目录下vim elasticsearch-env:大约39至50行定义了jdk的选择方法,取消检查启用自行安装的java,参数为JAVA_HOME修改为:删除判断即可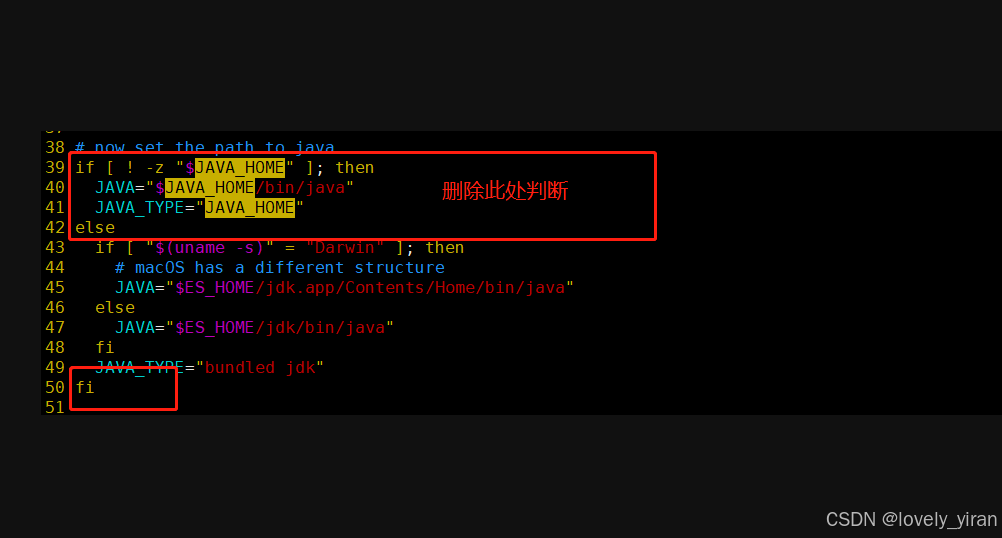
2.5 权限错误
将目录/opt/es 及其下面的所有文件、子目录的文件主改成 esroot
chown -R esroot:esroot /opt/es三、配置密码
如果想要添加账户密码,只需要在config/elasticsearch.yml中添加下面两个配置:
xpack.security.enabled: true
xpack.security.transport.ssl.enabled: true
上面两个配置表示启用x-pack验证插件
然后重启ElasticSearch,执行下面的命令即可设置与ElasticSearch关联的一些账号的密码:
bin/elasticsearch-setup-passwords interactive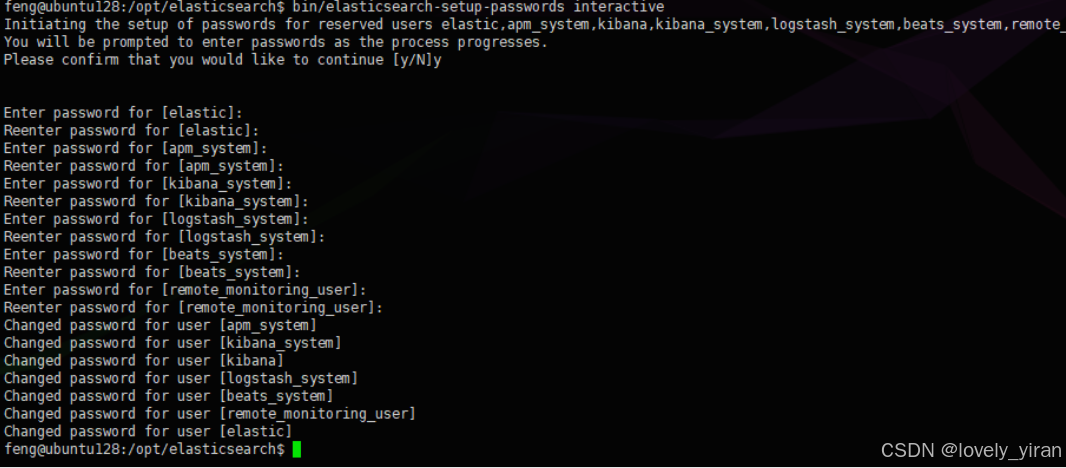
设置完成之后就需要使用账号密码访问了,账号就是上图的第一个设置elastic:
# 不带认证访问会报认证异常
curl http://localhost:9200/_cat/indices
# -u参数指定账号,执行后会提示输入密码
curl -u elastic http://localhost:9200/_cat/indices
# -u参数指定账号和密码,格式:user:password
curl -u elastic:123456 http://localhost:9200/_cat/indices
设置了密码,还可以修改密码:
# 需要使用api来操作修改密码
curl -XPOST -u elastic http://localhost:9200/_security/user/elastic/_password -H "Content-Type:application/json" -d "{"password":"abcdefg"}"如果忘记密码,可以先取消认证,即注释掉上面config/elasticsearch.yml中添加的两个配置,然后重启ElasticSearch,然后找到一个类型.security-X的index,删除掉就可以回到最初无密码认证的状态了:
# 查看.security-X存在与否
curl http://localhost:9200/_cat/indices | grep ".security"
# 删除index,我这里是.security-7
curl -XDELETE http://localhost:9200/.security-7
四、logstash安装
4.1、下载:Logstash 7.12.1 | Elastic
4.2、解压到指定目录
tar -zxvf logstash-7.12.1.tar.gz -C /opt/es4.3、配置config目录下的logstash.conf
 input {
    stdin {
    }
    jdbc {
      # mysql jdbc connection string to our backup databse
      jdbc_connection_string => "jdbc:mysql://localhost:3306/test?characterEncoding=UTF-8&useSSL=false"
      # the user we wish to excute our statement as
      jdbc_user => "root"
      jdbc_password => "password"
      # the path to our downloaded jdbc driver
      jdbc_driver_library => "../mysql/mysql-connector-java-8.0.23.jar"
      # the name of the driver class for mysql
      jdbc_driver_class => "com.mysql.jdbc.Driver"
      jdbc_paging_enabled => "true"
      jdbc_page_size => "50000"
      jdbc_default_timezone => "UTC"
      statement_filepath => "../mysql/bm/policy.sql"
      #追踪的字段(使用MySQL中的时间字段而不使用自增的id字段;因为自增的id字段无法实现更新问题,因为后面需要更新的id值会小于last_run_metadata_path记录的值而无法实现更新操作)
      record_last_run => true
      use_column_value => true
      tracking_column => update_time
      #last_run_metadata_path => "/../mysql/bm/data/policy.txt"
      # 是否清除 last_run_metadata_path 的记录,true则每次都从头开始查询所有的数据库记录
      clean_run => false
      schedule => "* * * * *"
      type => "test_type1"
    }
}

filter {
    json {
        source => "message"
        remove_field => ["message"]
    }
     # deleted、disabled =1为删除或者禁用的数据,这里判断然后给加上delete标识
      # 我理解的action相当于 @metadata对象的一个属性,应该还可以加其他的,比如[@metadata][test]
      if ([remove_flag] == "-1" ){
        mutate{ add_field => { "action" => "delete"}}
      } else {
        mutate{ add_field => { "action" => "index"}}
      }
}

output {

    if[type] == "test_type1" {
        elasticsearch {
            action => "%{action}"
            hosts => ["localhost:9201"]
            index => "type1"
            document_type=>"type1"
            document_id => "%{id}"
            user => "elastic"
            password => "password"
        }
    }

    stdout {
        codec => json_lines
    }
}
4.4、启动命令
cd ./bin
nohup ./logstash -f config/logstash.conf &