运行 DeepSeek R1 的 Raspberry Pi AI 服务器 | Raspberry Pi AI Server Running DeepSeek R1
1. 项目核心功能 | Core Features of the Project
-
离线大模型推理
Supports running lightweight large models like DeepSeek R1 1.5B/7B, enabling text generation, code writing, and Q&A interactions.-
支持运行DeepSeek R1 1.5B/7B等轻量化大模型,实现文本生成、代码编写与问答交互。
-
完全本地执行,无需网络连接,确保隐私保护。
Fully local execution with no internet requirement, ensuring privacy protection.
-
-
便携式硬件设计
Portable Hardware Design-
树莓派5B + PiSugar 3 Plus电池,轻量化设计提供2-3小时续航。
Raspberry Pi 5B + PiSugar 3 Plus battery provides 2-3 hours of runtime with a lightweight design. -
定制3D打印外壳,集成散热与电源管理。
Custom 3D-printed case integrates cooling and power management.
-
-
多模态交互接口
Multi-Modal Interaction Interface-
Open WebUI:提供类ChatGPT的网页交互界面。
Open WebUI: Provides a ChatGPT-like web-based interface. -
命令行接口:允许开发者直接调用API。
Command Line Interface: Allows developers to directly invoke APIs. -
局域网共享:支持多用户通过浏览器访问。
Local Network Sharing: Enables multi-user access via a web browser.
-
2. 项目架构 | Project Architecture
[PiSugar 3 Plus Battery]
       ↓ Power Supply
[Raspberry Pi 5B]
├─ Ollama Service (DeepSeek R1 Model)
├─ Open WebUI (Frontend Interaction)
├─ Power Management Module (Battery Monitoring / Power Saving Strategy)
└─ Cooling Control (Temperature-Controlled Fan + Metal Case)
       ↓ Output
[User Device] → Browser/SSH/API Call
3. 硬件与软件配置 | Hardware and Software Configuration
树莓派5B性能配置 | Raspberry Pi 5B Performance
-
8GB内存:足以运行1.5B/7B参数模型(7B模型需约4-6GB内存)。
8GB RAM: Sufficient for running models with 1.5B/7B parameters (7B models require about 4-6GB of RAM). -
CPU:Cortex-A76四核2.4GHz,较树莓派3B+/4B性能显著提升,推理速度更快。
CPU: Cortex-A76 quad-core 2.4GHz, significantly improved over Raspberry Pi 3B+/4B, enabling faster inference speeds. -
32GB TF卡:确保合理分配存储空间。
32GB TF Card: Ensure proper storage space allocation.
PiSugar 3 Plus电池 | PiSugar 3 Plus Battery
-
5000mAh容量:在高负载LLM推理下可为树莓派5B供电2-3小时,低功耗模式下可达6-8小时。
5000mAh Capacity: Powers Raspberry Pi 5B for 2-3 hours under high-load LLM inference and 6-8 hours in low-power mode. -
便携性:结合定制外壳,打造真正的“口袋AI服务器”。
Portability: Combined with a custom case, it creates a true "pocket-sized AI server."
系统镜像 | System Image
-
Raspberry Pi OS(64位)
Raspberry Pi OS (64-bit)
4. 实现步骤 | Implementation Steps
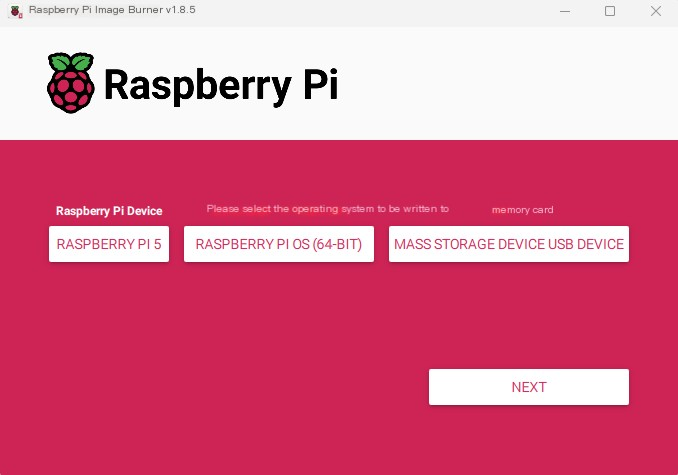
步骤1:烧录系统镜像 | Step 1: Flash the System Image
准备工作 | Preparation
-
所需材料:读卡器、TF卡。
Required materials: Card reader, TF card. -
下载烧录工具:访问树莓派Imager官网:https://www.raspberrypi.com/software/ 下载软件。
Download the flashing tool: Visit the Raspberry Pi Imager official site at https://www.raspberrypi.com/software/ to download the software.
烧录流程 | Flashing Process
-
点击“CHOOSE DEVICE”并选择Raspberry Pi 5。
Click "CHOOSE DEVICE" and select Raspberry Pi 5. -
点击“CHOOSE OS”并选择Raspberry Pi OS(64位)。
Click "CHOOSE OS" and select Raspberry Pi OS (64-bit). -
将MicroSD卡插入读卡器并连接电脑,选择“CHOOSE STORAGE”。
Insert the microSD card into the card reader, connect it to your computer, and select "CHOOSE STORAGE".
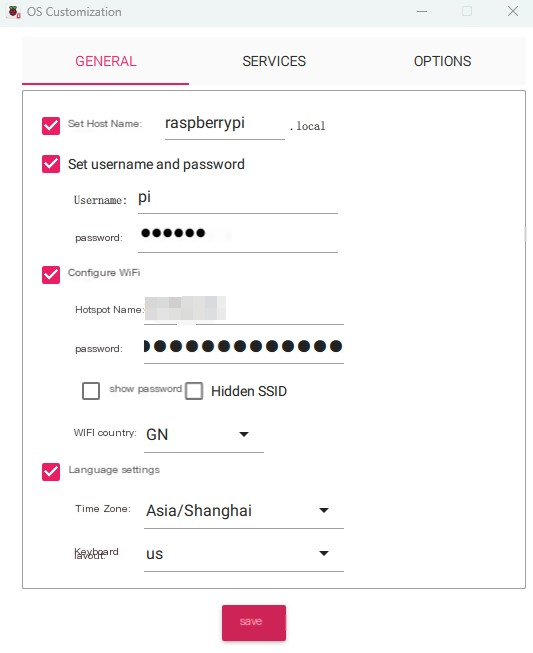
5. 自定义系统设置 | Customize OS Settings
用户名与密码设置 | Username & Password
-
设置SSH登录的管理员凭据
Set administrator credentials for SSH login.
WiFi网络配置 | WiFi Credentials
-
确保树莓派接入正确网络
Ensure the Raspberry Pi connects to the correct network.
设备主机名定义 | Device Hostname
-
自定义设备在局域网的广播名称
Define the Pi's network broadcast name.
区域设置优化 | Region Settings
-
配置时区与键盘布局
Configure time zone and keyboard layout.
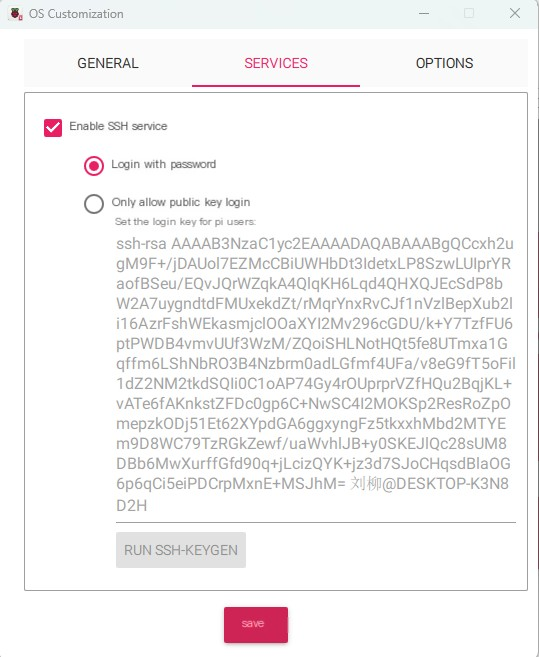
Enable Remote Access 启用远程访问:
Under "Services", enable SSH and select "Password Authentication".
在"Services"下方,启用SSH并选择"Password Authentication"。
保存设置并烧录 | Save Settings & Write Image
-
点击「保存」确认系统定制设置
Click "SAVE", then confirm OS customization settings. -
点击「是」开始写入镜像至存储设备
Click "YES" to write the image to the storage device. -
烧录完成后安全弹出SD卡,插入树莓派启动
Once flashing is complete, eject the SD card and insert it into the Raspberry Pi to boot.
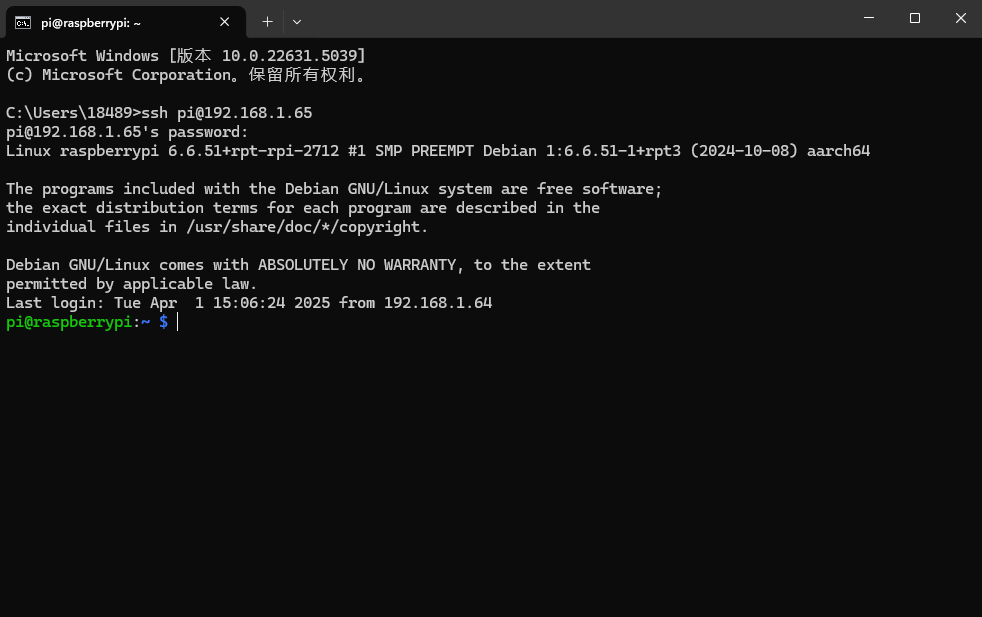
Step 2: Connect Raspberry Pi via SSH
硬件组装与启动 | Hardware Assembly & Power On
-
组装组件:树莓派5B + PiSugar 3 Plus电池 + 散热风扇 + TF卡
After assembling the Raspberry Pi 5, PiSugar 3 Plus, cooling fan, and TF card, power on the device.
SSH连接操作 | SSH Connection Steps
-
在主机打开命令提示符
On your host machine:-
Windows:
-
按下
Win + R→ 输入cmd→ 回车
PressWin + R, typecmd, and press Enter to open the command prompt.
-
-
macOS/Linux:
直接打开终端
Open Terminal directly
-
-
执行SSH连接命令 | Execute SSH connection command
ssh [用户名]@raspberrypi.local
# 示例(默认用户为pi):
# Example (default user is pi):
ssh pi@raspberrypi.local
步骤3:安装Ollama与模型下载 | Step 3: Install Ollama and Download the Model
Ollama简介 | About Ollama
-
核心功能:专为本地环境运行与定制大语言模型设计的工具,提供简洁高效的管理接口。
Ollama is a tool designed for running and customizing large language models in local environments. It provides a simple, efficient interface for managing models. -
适用场景:开发者快速部署AI应用 / 终端用户本地隐私保护推理
Use Cases: Rapid AI deployment for developers / Privacy-preserving local inference for end users
安装流程 | Installation Process
1. 安装依赖项 | 1. Install dependencies
# 更新系统
sudo apt update && sudo apt upgrade -y

# 安装基础编译工具
sudo apt install -y build-essential curl
2. 一键安装Ollama(ARM64专用)| 2. One-click installation of Ollama (ARM64 only)
# 下载安装脚本
curl -fsSL https://ollama.com/install.sh | sudo sh

# 验证安装
ollama --version
# 预期输出:ollama version 0.1.xx
3. 配置系统服务 | 3. Configure system services |
# 启动Ollama服务
sudo systemctl enable ollama
sudo systemctl start ollama

# 检查服务状态
systemctl status ollama
# 正常应显示 active (running) 4.下载DeepSeek R1模型 | Launch the DeepSeek R1 Model
# 下载1.5B参数版本(适合8GB内存)
ollama pull deepseek-r1:1.5b

# 或下载7B参数版本(需确保swap空间充足)
ollama pull deepseek-r1:7b

步骤4:部署Open WebUI | Step 4: Deploy Open WebUI
项目目标 | Project Objectives
将树莓派变为小型AI聊天服务器,提供类ChatGPT的网页交互体验。
Turn your Raspberry Pi into a small AI chat server with a ChatGPT-like web interface.
1. 创建Python虚拟环境 | Set Up Python Virtual Environment
# 安装虚拟环境工具
sudo apt install python3.11-venv -y

# 创建项目目录并进入
mkdir ~/openwebui && cd ~/openwebui

# 创建虚拟环境
python3 -m venv venv

# 激活环境
source venv/bin/activate
# 提示符变为 (venv) 表示激活成功
2. 安装Open WebUI核心依赖 | Install Core Dependencies
# 确保在虚拟环境中操作
(venv) pip install --upgrade pip wheel setuptools

# 安装GPU加速支持(可选,需Vulkan兼容驱动)
(venv) sudo apt install libvulkan1 -y
(venv) pip install torch torchvision --extra-index-url https://download.pytorch.org/whl/arm64

# 安装Open WebUI
(venv) pip install open-webui --no-cache-dir
3. 配置服务参数 | Service Configuration
server:
  host: 0.0.0.0  # 允许局域网访问
  port: 8080      # 自定义端口
ollama:
  base_url: http://localhost:11434  # 连接本地Ollama
auth:
  enabled: true   # 启用登录认证
4. 启动服务 | Start Service
(venv) nohup openwebui --config config.yml > webui.log 2>&1 &

5. 访问验证 | Access Verification
-
本地访问:
浏览器打开http://localhost:8080 -
局域网访问:
使用树莓派IP地址:http://[树莓派IP]:8080
Q&A | 常见问题解答
1. 无法通过主机名SSH连接 | Unable to SSH using Hostname
解决方案:
-
确认网络环境:确保树莓派与操作主机处于同一局域网。
Ensure the Raspberry Pi and host machine are on the same network. -
检查SSH服务:烧录系统时需启用SSH(在boot分区创建空文件
ssh)。
Make sure SSH is enabled during system flashing (create emptysshfile in boot partition). -
使用PiSugar WiFi工具:
# 安装PiSugar网络配置工具
curl https://cdn.pisugar.com/PiSugar-wificonfig/script/install.sh | sudo bash
# 运行交互式配置
sudo pisugar-wificonfig
2. 加速Ollama模型下载(代理配置) | Speeding Up Ollama Model Downloads via Proxy
操作步骤:
-
获取主机IP(Windows示例):
ipconfig # 查找"IPv4 Address"(如192.168.1.100) -
开启代理软件(如Clash):
-
启用Allow LAN(允许局域网共享代理)| 1.Enable Allow LAN (allow LAN to share proxy)
-
确认代理端口(默认7890)| 2. Confirm the proxy port (default 7890)
-
-
树莓派代理配置: | Raspberry Pi proxy configuration:
# 临时生效(当前会话)
export http_proxy=http://主机IP:7890
export https_proxy=http://主机IP:7890
# 永久生效(写入环境变量)
echo "export http_proxy=http://主机IP:7890" >> ~/.bashrc
echo "export https_proxy=http://主机IP:7890" >> ~/.bashrc
source ~/.bashrc
3. 解决Open WebUI安装超时 | Resolving Open WebUI Installation Timeout
优化方案:
-
更换国内PyPI镜像源:| Change the domestic PyPI mirror source:
# 全局配置(推荐)
sudo nano /etc/pip.conf
[global] index-url = https://pypi.tuna.tsinghua.edu.cn/simple timeout = 600 # 增加超时时间 -
清理缓存并重试:| Clear the cache and try again:
pip cache purge pip install open-webui --no-cache-dir -
分步安装依赖:| Install dependencies step by step:
# 先安装基础依赖
pip install fastapi uvicorn httpx
# 再安装完整包
pip install open-webui
最终成果 | Final Outcome
通过以上步骤,您已成功将树莓派5B改造为:
-
🚀 便携式AI服务器:PiSugar 3 Plus电池提供2-3小时离线推理能力
-
🔒 隐私安全:完全本地运行,无数据外传风险
-
🌐 多用户支持:通过Open WebUI实现局域网内多设备访问
本文地址:https://www.vps345.com/10062.html