Windows 下 VMamba 安装教程(无需更改base环境中的cuda版本且可加速)
导航
安装教程导航
Mamba 及 Vim 安装问题参看本人博客:Mamba 环境安装踩坑问题汇总及解决方法(初版)- Linux 下 Mamba 安装问题参看本人博客:Mamba 环境安装踩坑问题汇总及解决方法(重置版)
- Windows 下 Mamba 的安装参看本人博客:Window 下Mamba 环境安装踩坑问题汇总及解决方法 (无需绕过selective_scan_cuda)
- Linux 下 Vim 安装问题参看本人博客:Linux 下 Vim 环境安装踩坑问题汇总及解决方法(重置版)
- Windows 下 Vim 安装问题参看本人博客:Window 下 Vim 环境安装踩坑问题汇总及解决方法
- Linux 下Vmamba 安装教程参看本人博客:Vmamba 安装教程(无需更改base环境中的cuda版本)
- Windows 下 VMamba的安装参看本人博客:Windows 下 VMamba 安装教程(无需更改base环境中的cuda版本且可加速)
- Windows下 Mamba2及高版本 causal_conv1d 安装参考本人博客:Windows 下Mamba2 环境安装问题记录及解决方法(causal_conv1d=1.4.0)
- Windows 下 Mamba / Vim / Vmamba 环境安装终极版参考本人博客:Windows 下Mamba2 / Vim / Vmamba 环境安装问题记录及解决方法终极版(无需绕过triton)
- (GPU算力12.0版本)Windows 下 Mamba / Vim / Vmamba 环境配置教程 参考本人博客:Windows 下 Mamba / Vim / Vmamba 环境配置安装教程(适用于5070,5080,5070Ti等GTX 50系显卡)
安装教程及安装包索引
不知道如何入手请先阅读新手索引:Linux / Windows 下 Mamba / Vim / Vmamba 安装教程及安装包索引
本系列教程已接入ima知识库,欢迎在ima小程序里进行提问!(如问题无法解决,安装问题 / 资源售后 / 论文合作想法请+文末或个人简介vx)
目录
- 导航
- 安装教程导航
- 安装教程及安装包索引
- 背景
- Windows 下环境准备
- Windows 下 `selective_scan` 的编译
- Windows 下 `selective_scan` 的编译出现的问题和解决(20240714)
- 0. 基本报错
- 1. error: identifier "M_LOG2E" is undefined
- 2. error C2975: “kDeltaSoftplus_”
- 20240715 更新
- 3. fatal error C1083: 无法打开包括文件:“cuda_runtime.h”
- 4. fatal error C1189: # error: unsupported Microsoft Visual Studio version!
- 5. fatal error C1083: 无法打开包括文件: “cusparse.h”
- 6. 正常安装 Vmamba 找不到找不到 selective_scan_cuda 模块
- 7. 无法导入selective_scan_cuda_oflex和selective_scan_cuda_core模块
- 8. 正常安装 Vmamba 找不到 selective_scan_cuda_core 模块
- 9. 出现 `RuntimeError: Failed to find C compiler. `
- 10. ImportError: DLL load failed
- 20250109 更新
- 关于 `triton` 的问题
- 关于whl付费的说明
背景
最近有不少小伙伴在 Linux 上安装 Vmamba (VMamba: Visual State Space Model)时,按照官方的安装命令会遇到各种各样的错误,Linux 版本的问题可参考本人之前的博客——Vmamba 安装教程(无需更改base环境中的cuda版本),本篇主要聚焦于 Windows 下 Vmamba 环境的安装,主要参考 issue。(安装问题 / 资源自取售后 / 论文合作想法请加主页wx)注意,Mamba 和 Vmamba 的环境安装步骤是不同的,请加以区分。
Windows 下环境准备
- 运行之前需要下载好 Vmamba 官方的源码,用
git下载方式如下:
git clone https://github.com/MzeroMiko/VMamba.git
cd VMamba
- 前期环境准备,同原来博客 “Window 下Mamba 环境安装踩坑问题汇总及解决方法 (无需绕过selective_scan_cuda)” ,具体为:
conda create -n mamba python=3.10
conda activate mamba
conda install cudatoolkit==11.8
pip install torch==2.1.1 torchvision==0.16.1 torchaudio==2.1.1 --index-url https://download.pytorch.org/whl/cu118
pip install setuptools==68.2.2
conda install nvidia/label/cuda-11.8.0::cuda-nvcc_win-64
conda install packaging
pip install triton-2.0.0-cp310-cp310-win_amd64.whl
其中Windows下triton 2.0.0 的whl下载链接为:网盘、triton 2.1.0 版本的下载链接 以及 triton 的 Windows 包 。
上述安装包里面 triton 核心的 triton.jit 和 torch.compile 等功能均无法像Linux下正常运行,上述安装包只是从形式上完成编译,所以你选什么版本都行,只要能形式上装上。
Windows 下完全使用triton的终极版参考本人博客:Windows 下Mamba2 / Vim / Vmamba 环境安装问题记录及解决方法终极版(无需绕过triton)
- 安装 Vmamba 其他必须包,只留最后一步编译
pip install -r requirements.txt
cd kernels/selective_scan
Windows 下 selective_scan 的编译
- 将
kernels/selective_scan/csrc/selective_scan/static_switch.h的BOOL_SWITCH函数改为
#define BOOL_SWITCH(COND, CONST_NAME, ...)
    [&] {
        if (COND) {
            static constexpr bool CONST_NAME = true;
            return __VA_ARGS__();
        } else {
            static constexpr bool CONST_NAME = false;
            return __VA_ARGS__();
        }
    }()
这一步是将 constexpr 改为 static constexpr。
- 在如下文件
kernels/selective_scan/csrc/selective_scan/cus/selective_scan_bwd_kernel.cuh
kernels/selective_scan/csrc/selective_scan/cus/selective_scan_fwd_kernel.cuh
kernels/selective_scan/csrc/selective_scan/cusoflex/selective_scan_bwd_kernel_oflex.cuh
kernels/selective_scan/csrc/selective_scan/cusoflex/selective_scan_fwd_kernel_oflex.cuh
开头加入:
#ifndef M_LOG2E
#define M_LOG2E 1.4426950408889634074
#endif
- 完成上述修改后,执行
pip install .一般即可顺利编译,成功安装。 - 本人编译好的Windows 下的whl 也有:selective-scan-0.0.2(不含selective_scan_cuda_core) ,可直接下载安装。利用 whl 安装命令为:
pip install selective-scan-0.0.2-cp310-cp310-win_amd64.whl
而包含 selective_scan_cuda_core 编译方法见后文,笔者自己编辑的安装包为:
selective-scan-0.0.2(含selective_scan_cuda_core)
Windows 下 selective_scan 的编译出现的问题和解决(20240714)
0. 基本报错
当编译中遇到任意错误时,均会输出下图所示的提示:

内容上即:
Building wheels for collected packages: selective-scan
Building wheel for selective-scan(setup.py)... error
error:subprocess-exited-with-error
python setup.py bdist_wheel did not run successfully.
exit code:1
[172 lines of output]
No CUDA runtime is found, using CUDA_HOME='E:Anaconda
mamba'
torch._version=2.1.1+cu118
CUDA HOME = E:Anacondavmamba
CUDA version :11.8
running bdist_wheel
running build
running build_ext
E: Anacondavmamballibsite-packages(torchutilscpp_extension.py:383: UserWarning: Error checking compiler versioforcl:[WinError2]系统找不到指定的文件。
warnings.warn(f'Error checking compiler version for {compiler}: {error}')
building 'selective scan cudaoflex'extension
creating E:DesktopToDoVMambalkernelsselective_scanbuild
creating E:DesktopToDoVMambakernelsselective_scanbuildtemp.win-amd64-cpython-310
注意:此处的报错信息不包含有价值的信息,应该往下找真正的报错 error (非 warning)。
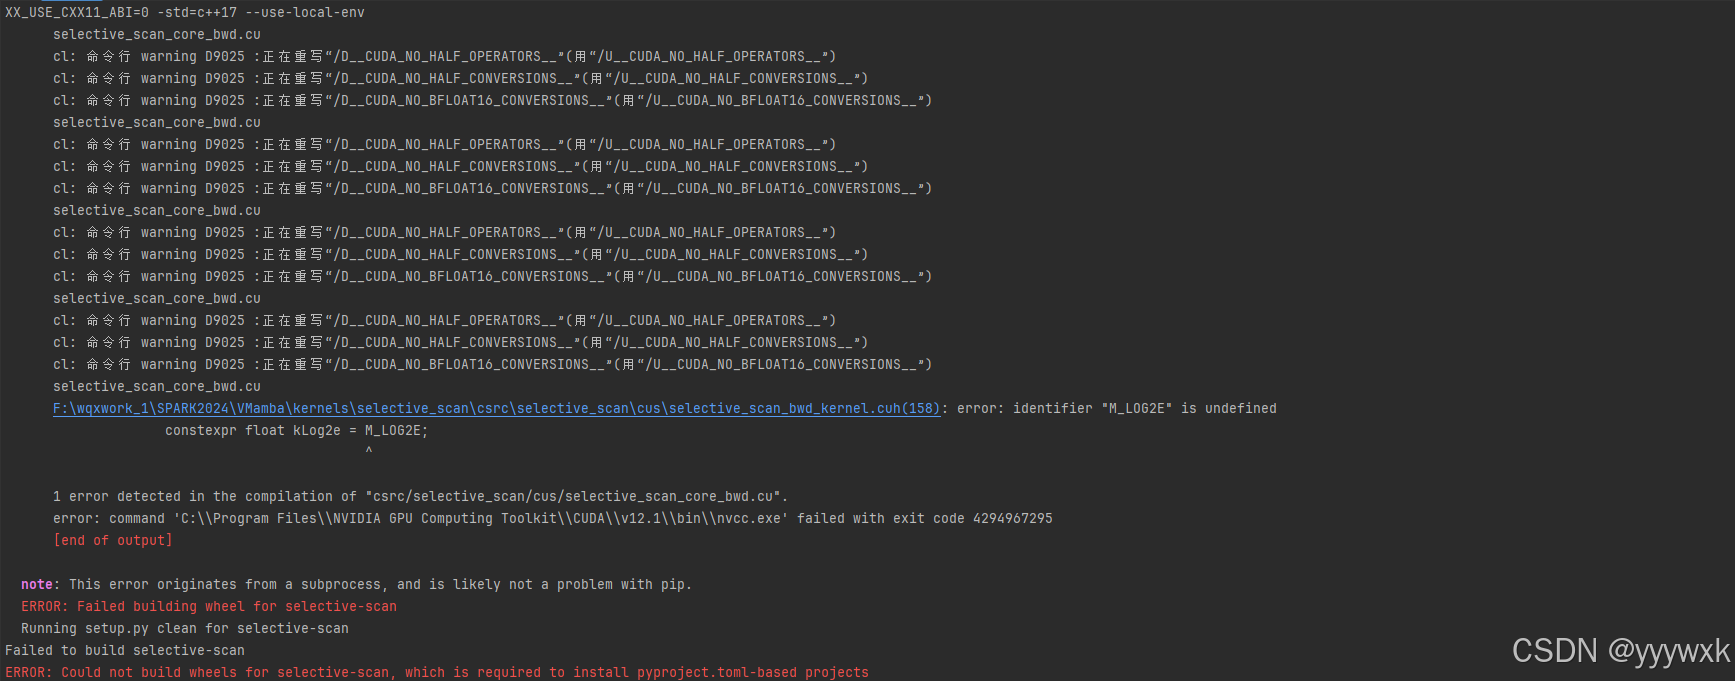
1. error: identifier “M_LOG2E” is undefined
在Windows下会出现如下报错:
出现这种情况的原因,可参考 issue:
Note for the owners: The reason for needing #define is stated here: https://stackoverflow.com/a/56974843:
“On windows it is using the Microsoft compiler for that. So the Microsoft compiler is correct to disallow VLA, and there is no way to avoid this AFAIK. Your code works on linux, because on linux nvcc uses the g++ host compiler, and it allows (in a non-standard-compliant way) the use of a VLA in C++ host code.”
因此,只需在四个文件下加入以下代码即可
#ifndef M_LOG2E
#define M_LOG2E 1.4426950408889634074
#endif
具体文件和步骤参看前一节。
2. error C2975: “kDeltaSoftplus_”
在Windows下会出现如下大量报错:
error C2975: “kDeltaSoftplus_”:“Selective_Scan_bwd_kernel_traits”的模板参数无效,应为编译时常量表达式
如下图所示:
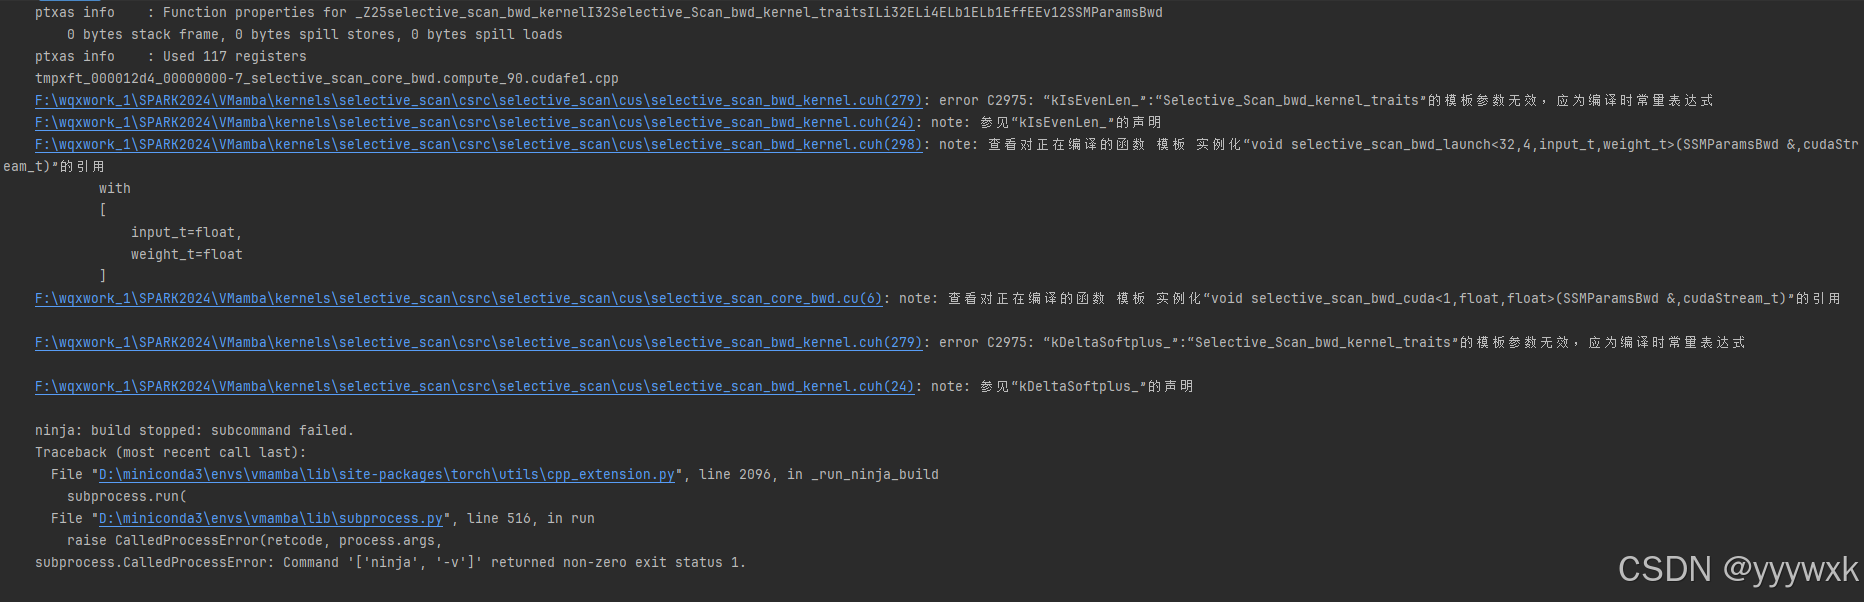
只需把static_switch.h 函数里的 constexpr 改为 static constexpr,参考 issue。具体步骤参看前一节。
20240715 更新
3. fatal error C1083: 无法打开包括文件:“cuda_runtime.h”
如果遇到下面的错误:
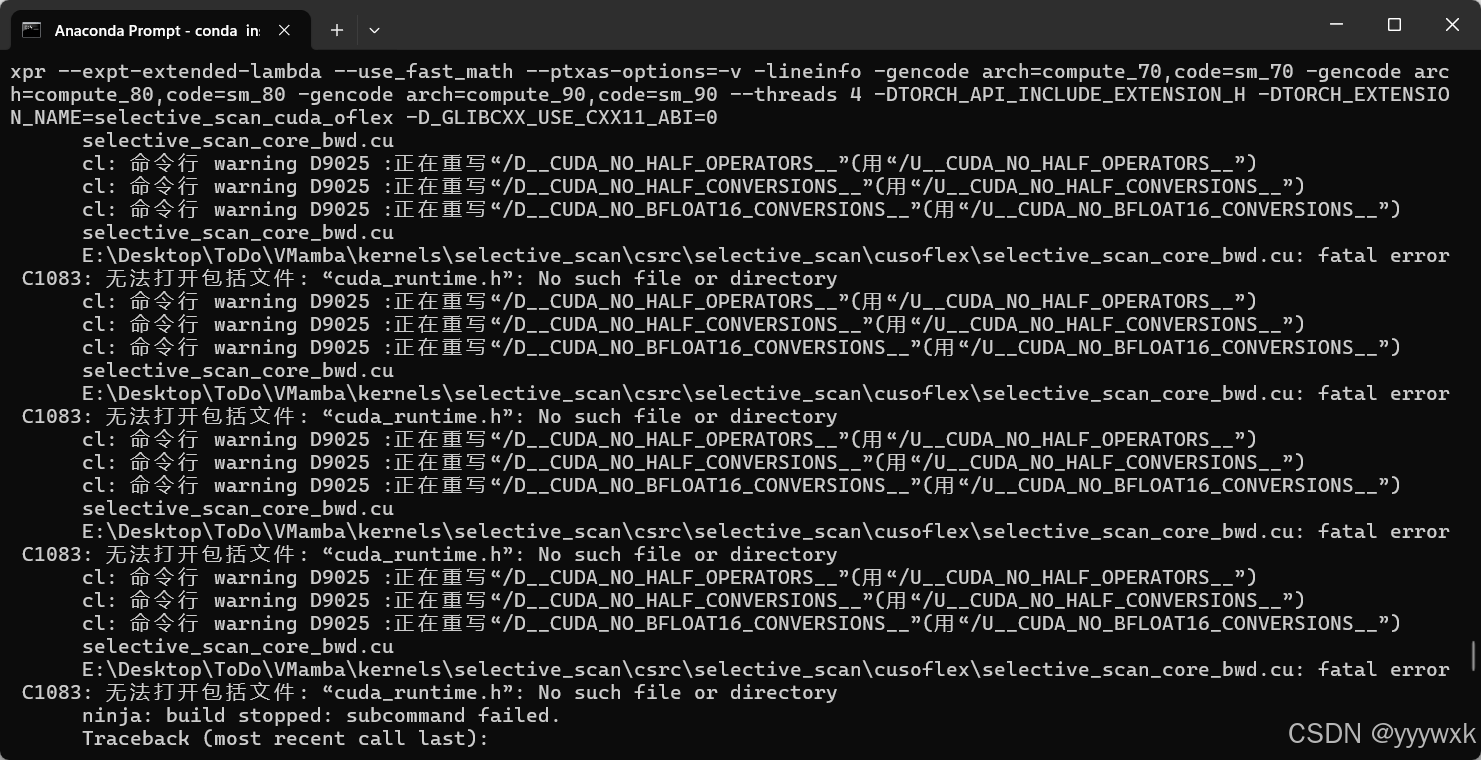
显示为 fatal error C1083: 无法打开包括文件:“cuda_runtime.h”: No such file or directory :
E:VNambalkernelsselective _scan csrc selective _scan cusoflex selective_scan_core_bwd.cu: fatal error C1083:无法打开包括文件:“cuda_runtime.h”: No such file or directory
参考本人之前博客:VMamba 安装教程(无需更改base环境中的cuda版本),解决方案为:
conda install nvidia/label/cuda-11.8.0::cuda-cudart-dev # 根据CUDA版本
4. fatal error C1189: # error: unsupported Microsoft Visual Studio version!
如遇到以下错误:
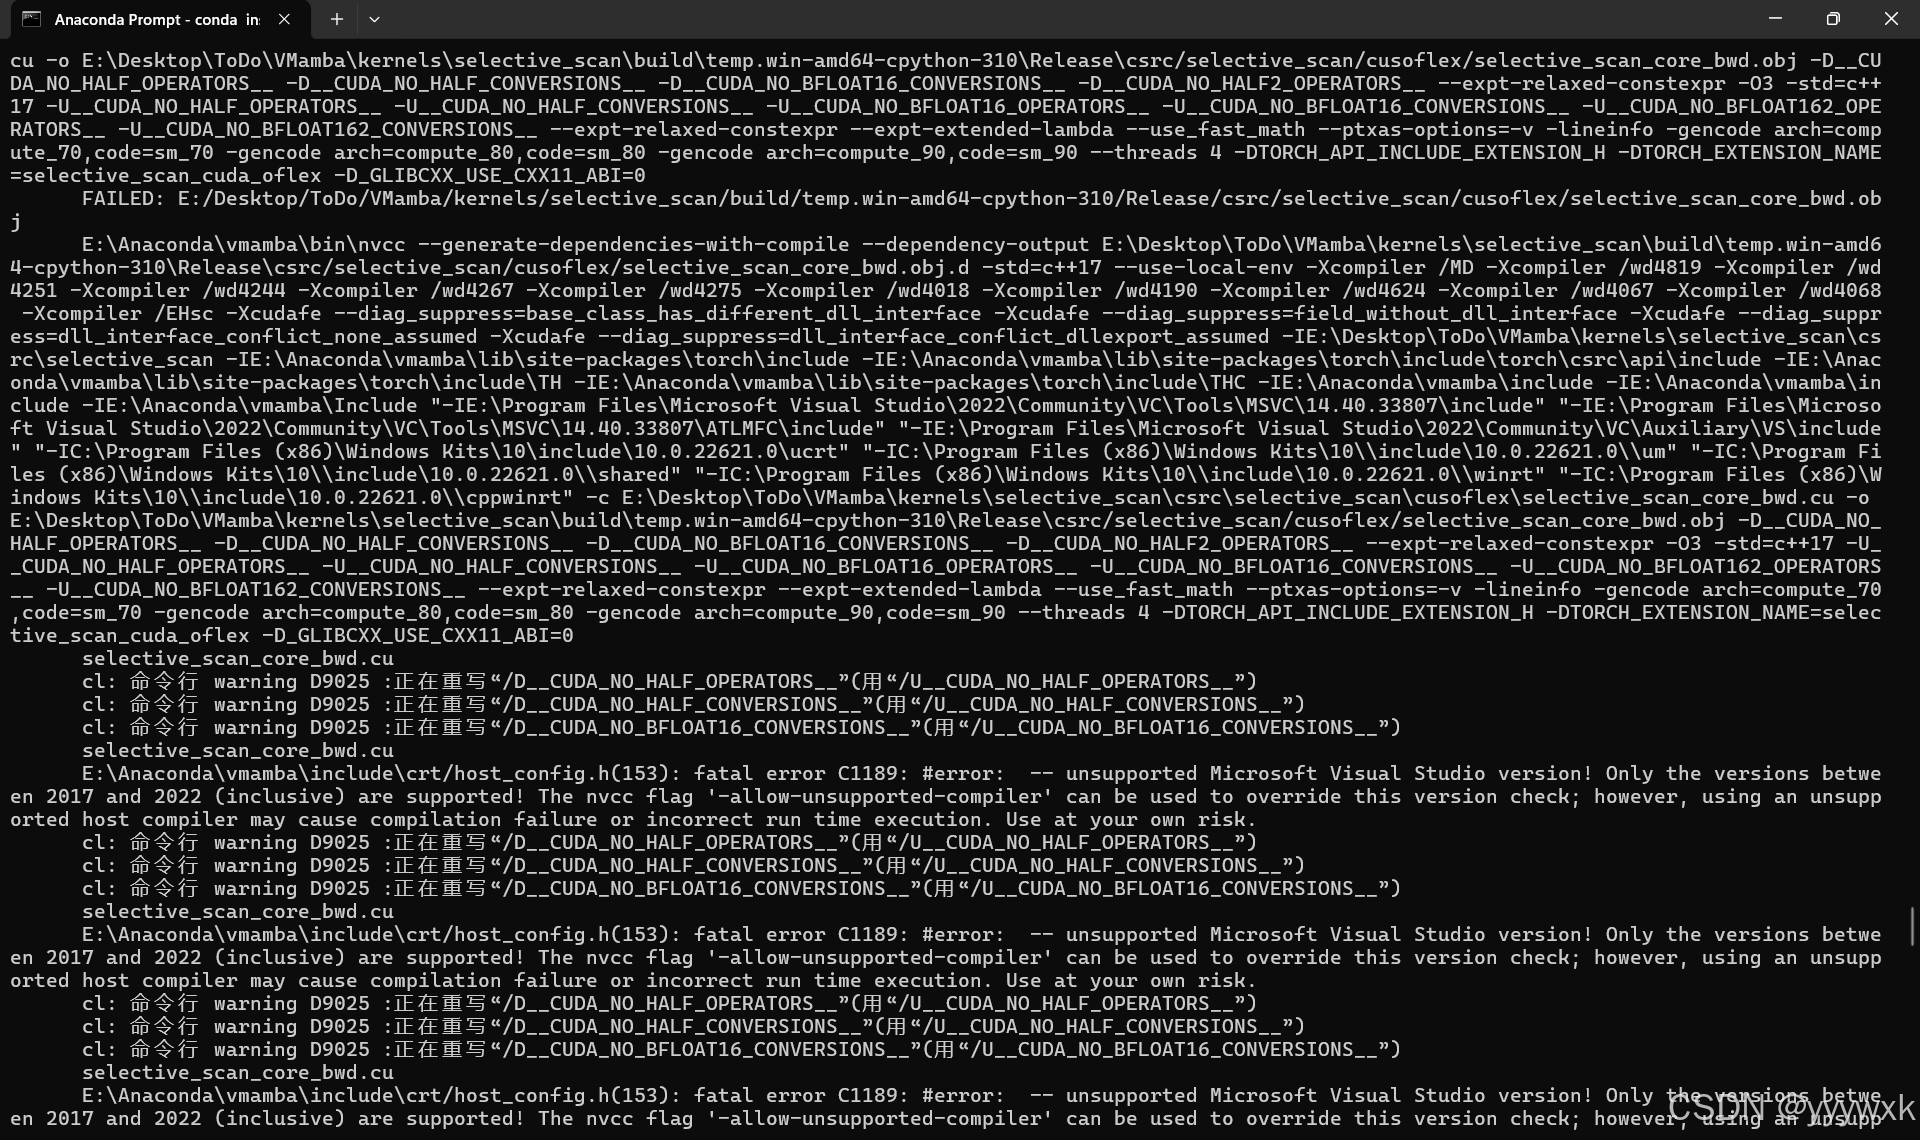
具体为fatal error C1189: #error: -- unsupported Microsoft Visual Studio version! :
E:Anacondavmambalincludecrt/host_config.h(153): fatal error C1189: #error: -- unsupported Microsoft Visual Studio version! Only the versions between 2017 and 2022 (inclusive) aresupported! The nvcc flag '-allow-unsupported-compiler' can be used to override this version check; however, using an unsupported host compiler may cause compilation failure or incorrect run time execution. Use at your own risk.
此类报错只是一连串报错的结果,不包含有用的报错信息,应该在其前面寻找真正的报错原因。
5. fatal error C1083: 无法打开包括文件: “cusparse.h”
如果遇到以下报错:
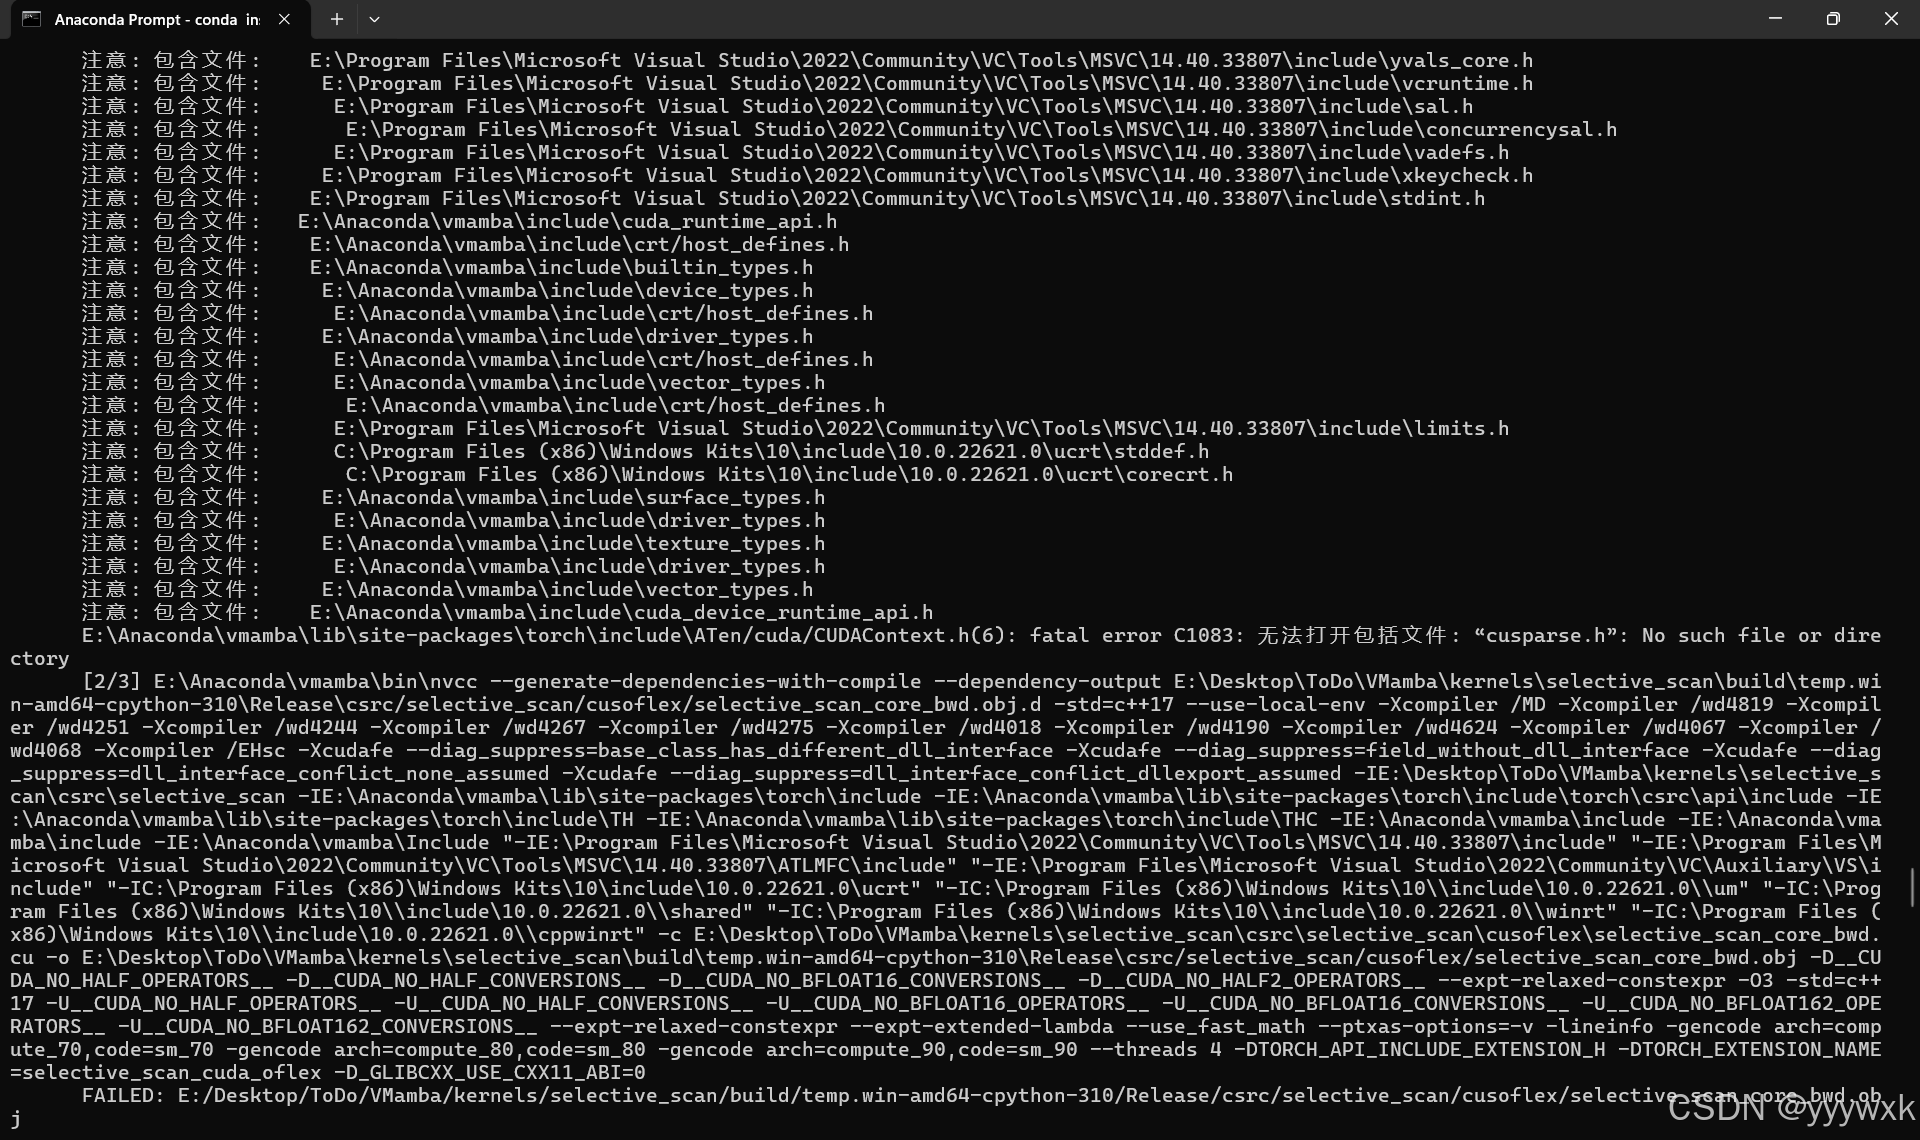
显示为 fatal error C1083: 无法打开包括文件: “cusparse.h”: No such file or directory :
E:Anacondavmanba liblsite-packagesitorch include Aen/cuda/cuDAcontext.h(6): fatal eror C1083: 无法打开包括文件:“cusparse,h”; No such file or directory
这个问题同Linux下的错误,可参考本人之前博客:VMamba 安装教程(无需更改base环境中的cuda版本):
conda install nvidia/label/cuda-11.8.0::libcusparse-dev # 根据CUDA版本
类似地,如果遭遇到
fatal error C1083: 无法打开包括文件: “cublas_v2.h”: No such file or directoryfatal error C1083: 无法打开包括文件: “cusolverDn.h”: No such file or directoryfatal error C1083: 无法打开包括文件: “crypt.h”: No such file or directory
等报错,均可参考本人之前博客:VMamba 安装教程(无需更改base环境中的cuda版本)。
6. 正常安装 Vmamba 找不到找不到 selective_scan_cuda 模块
VMamba 中遇到selective_scan_cuda 模块
No module named 'selective_scan_cuda'
VMamba 的代码和 Mamba 是独立的,如果想有 selective_scan_cuda 包,则需要安装 mamba_ssm,参考之前博客:
- Linux:Mamba 环境安装踩坑问题汇总及解决方法
- Windows :Window 下Mamba 环境安装踩坑问题汇总及解决方法 (无需绕过selective_scan_cuda)
注意,mamba 的这个包在Vmamba里面不是必须的。
7. 无法导入selective_scan_cuda_oflex和selective_scan_cuda_core模块
这是因为安装的是Mamba 而不是 VMamba,Mamba 安装成功后环境中本来就没有selective_scan_cuda_oflex和selective_scan_cuda_core模块,请按Vmamba 正确的顺序安装 Vmamba的环境。
8. 正常安装 Vmamba 找不到 selective_scan_cuda_core 模块
除了selective_scan_cuda_core 模块,还有可能找不到 selective_scan_cuda_nrow 模块,这是因为在编译 selective_scan 时,在 setup.py 第40行选用的模式只有 [‘oflex’]
MODES = ["oflex"]
# MODES = ["core", "ndstate", "oflex"]
# MODES = ["core", "ndstate", "oflex", "nrow"]
改为:
MODES = ["core", "oflex"]
# MODES = ["core", "ndstate", "oflex"]
# MODES = ["core", "ndstate", "oflex", "nrow"]
修改此处再编译即可。注意,该模块也不是必须的。而ndstate 在最新代码中源文件已经被删除,默认模式即可,不需要修改,不做深入研究无必要安装这个包。
Win 下面编译好的 whl 为:selective-scan-0.0.2-cp310-cp310-win-amd64.whl (包含core),selective_scan_cuda_core 模块为:selective-scan-cuda-core.cp310-win-amd64.pyd。
9. 出现 RuntimeError: Failed to find C compiler.
具体来说,遇到以下报错 RuntimeError: Failed to find C compiler. Please specify via CC environment variable.:
D:Anaconda3envsvim_dvglpython.exe D:StudycodeVMambaclassificationmodelsvmamba.py
Traceback (most recent call last):
File "D:StudycodeVMambaclassificationmodels
mamba.py", line 1857, in <module>
output = network(input_image)
File "D:Anaconda3envs
im_dvgllibsite-packages orch
nmodulesmodule.py", line 1518, in _wrapped_call_impl
return self._call_impl(*args, **kwargs)
File "D:Anaconda3envs
im_dvgllibsite-packages orch
nmodulesmodule.py", line 1527, in _call_impl
return forward_call(*args, **kwargs)
File "D:StudycodeVMambaclassificationmodels
mamba.py", line 1503, in forward
x = layer(x)
File "D:Anaconda3envs
im_dvgllibsite-packages orch
nmodulesmodule.py", line 1518, in _wrapped_call_impl
return self._call_impl(*args, **kwargs)
File "D:Anaconda3envs
im_dvgllibsite-packages orch
nmodulesmodule.py", line 1527, in _call_impl
return forward_call(*args, **kwargs)
File "D:Anaconda3envs
im_dvgllibsite-packages orch
nmodulescontainer.py", line 215, in forward
input = module(input)
File "D:Anaconda3envs
im_dvgllibsite-packages orch
nmodulesmodule.py", line 1518, in _wrapped_call_impl
return self._call_impl(*args, **kwargs)
File "D:Anaconda3envs
im_dvgllibsite-packages orch
nmodulesmodule.py", line 1527, in _call_impl
return forward_call(*args, **kwargs)
File "D:StudycodeVMambaclassificationmodels
mamba.py", line 1240, in forward
return self._forward(input)
File "D:StudycodeVMambaclassificationmodels
mamba.py", line 1228, in _forward
x = x + self.drop_path(self.op(self.norm(x)))
File "D:Anaconda3envs
im_dvgllibsite-packages orch
nmodulesmodule.py", line 1518, in _wrapped_call_impl
return self._call_impl(*args, **kwargs)
File "D:Anaconda3envs
im_dvgllibsite-packages orch
nmodulesmodule.py", line 1527, in _call_impl
return forward_call(*args, **kwargs)
File "D:StudycodeVMambaclassificationmodels
mamba.py", line 659, in forwardv2
y = self.forward_core(x)
File "D:StudycodeVMambaclassificationmodels
mamba.py", line 603, in forward_corev2
xs = cross_scan_fn(x, in_channel_first=True, out_channel_first=True, scans=_scan_mode, force_torch=scan_force_torch)
File "D:StudycodeVMambaclassificationmodelscsm_triton.py", line 507, in cross_scan_fn
return CSF.apply(x, in_channel_first, out_channel_first, one_by_one, scans)
File "D:Anaconda3envs
im_dvgllibsite-packages orchutograd
unction.py", line 539, in apply
return super().apply(*args, **kwargs) # type: ignore[misc]
File "D:StudycodeVMambaclassificationmodelscsm_triton.py", line 428, in forward
triton_cross_scan_flex[(NH * NW, NC, B)](
File "D:Anaconda3envs
im_dvgllibsite-packages riton
untimejit.py", line 166, in <lambda>
return lambda *args, **kwargs: self.run(grid=grid, warmup=False, *args, **kwargs)
File "D:Anaconda3envs
im_dvgllibsite-packages riton
untimejit.py", line 348, in run
device = driver.get_current_device()
File "D:Anaconda3envs
im_dvgllibsite-packages riton
untimedriver.py", line 230, in __getattr__
self._initialize_obj()
File "D:Anaconda3envs
im_dvgllibsite-packages riton
untimedriver.py", line 227, in _initialize_obj
self._obj = self._init_fn()
File "D:Anaconda3envs
im_dvgllibsite-packages riton
untimedriver.py", line 260, in initialize_driver
return CudaDriver()
File "D:Anaconda3envs
im_dvgllibsite-packages riton
untimedriver.py", line 122, in __init__
self.utils = CudaUtils()
File "D:Anaconda3envs
im_dvgllibsite-packages riton
untimedriver.py", line 69, in __init__
so = _build("cuda_utils", src_path, tmpdir)
File "D:Anaconda3envs
im_dvgllibsite-packages ritoncommonuild.py", line 101, in _build
raise RuntimeError("Failed to find C compiler. Please specify via CC environment variable.")
RuntimeError: Failed to find C compiler. Please specify via CC environment variable.
进程已结束,退出代码为 1
这是由于 triton 包在win下面不太兼容,因此可以绕过这种加速,即修改 VMamba/classification/models/csm_triton.py 里面的设置,将其开头第四行的 WITH_TRITON = True 改为 WITH_TRITON = False 即可。
10. ImportError: DLL load failed
如果是通过笔者的whl进行的安装,需要 python、torch 或者 cuda 版本和我的博客版本保持一致。(也检查一下的所下载的包介绍里的cuda版本,因为本人编译过的版本很多),否则会出现(首先需要保证,在import 这些包之前,已经 import torch):
ImportError: DLL load failed while importing selective_scan_cuda_oflex: 找不到指定的程序。
或者
ImportError: DLL load failed while importing selective_scan_cuda_core: 找不到指定的程序。
这种情况在系列博客【Window 下Mamba 环境安装踩坑问题汇总及解决方法 (无需绕过selective_scan_cuda)】里面已经讲过多次,百分百为 python、torch 或者 cuda 版本和我的博客版本不一致。
CUDA版本需要检查:
nvcc -V
python -c "import torch.utils.cpp_extension; print(torch.utils.cpp_extension.CUDA_HOME)"
确保其输出的是正确的版本或位置。尤其是要保证第二句命令输出的位置是正确的。
在 Win 下,则使用 where nvcc 虚拟环境正确的路径(路径到bin之前,不包括 bin vcc),把系统环境变量里的 CUDA_PATH 修改为该路径。或者在base环境里也装这个cuda内核版本(去nvidia官网下载安装包,譬如12以上的版本可以自动配置环境变量)。反正需要保证识别到的cuda版本是对的。
20250109 更新
关于 triton 的问题
由于 triton 官方目前只支持Linux,因此在 Windows 系统运行时,函数中只要涉及到其调用都会出现报错,包括但不限于:
KeyError: 'HOME'RuntimeError: failed to find C compiler, Please specify via cc environment variable.
终极解决方案参考Windows 下 Mamba / Vim / Vmamba 环境安装终极版:Windows 下Mamba2 / Vim / Vmamba 环境安装问题记录及解决方法终极版(无需绕过triton)
关于whl付费的说明
- 无论是Linux还是Win,在这些平台下面的Mamba,Vim 以及Vmamba 编译过程以及所有可能遇到的问题已经在本系列博客中全程开源并写明,不少同学按照本博客自己编译成功。
- 资金紧张但学有余力的同学请自己按照本教程自己动手编译,出现问题请查阅本系列所有博客,不鼓励从任何渠道购买!!!
- 为时间紧张的同学提供优惠通道:【(不含core / cuda11.8)selective-scan-0.0.2-cp310-cp310-win-amd64.whl】;【(含core / cuda11.8)selective-scan-0.0.2-cp310-cp310-win-amd64.whl】。
- 由于精力有限,只对【付费同学】全程售后,安装包本身没有价值,指导安装挤占了本人大量时间,所以付费其实是咨询费,其他同学随缘。
- 使用本人提供的whl请保证python、torch及cuda版本与博客里一致。否则会出现
DLL load failed问题。有环境版本定制化需求请私信vx。 - 网上有大量人抄袭本系列博客的教程,连本人当时随手建的环境都变成了这些教程的基础配置,还是请关注本系列博客的权威解答,除前述渠道外的其他渠道均需理性看待,谨防诈骗。