CSAPP 缓冲区溢出攻击:Ubuntu22.04中运行 ctarget 导致 Segmentation Fault
错误显示:
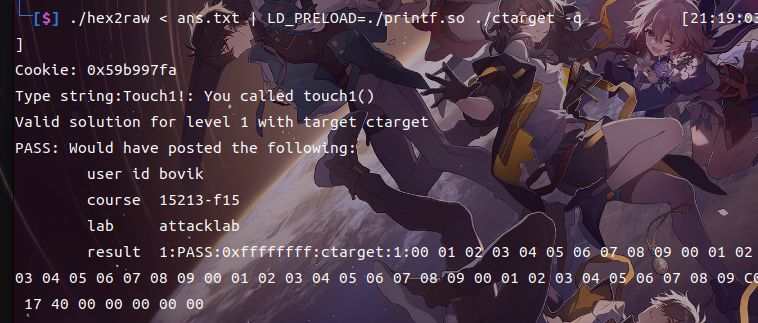
Cookie: 0x59b997fa
Type string:Touch1!: You called touch1()
Ouch!: You caused a segmentation fault!
Better luck next time
FAIL: Would have posted the following:
	user id	bovik
	course	15213-f15
	lab	attacklab
	result	1:FAIL:0xffffffff:rtarget:0:00 01 02 03 04 05 06 07 08 09 00 01 02 03 04 05 06 07 08 09 00 01 02 03 04 05 06 07 08 09 00 01 02 03 04 05 06 07 08 09 C0 17 40 00 00 00 00 00
解决参考:https://stackoverflow.com/questions/77568098/csapp-attack-lab-phase1-segmentation-fault-on-ubuntu22-04
CSAPP AttackLab:Ubuntu22.04中运行 ctarget 导致 Segmentation Fault_ubuntu 22.04 minio segmentation fault-CSDN博客
具体操作:
1.创建printf.c文件
#include
#include

int __printf_chk(int flag, const char *fmt, ...) {
  va_list ap;
  int ret;
  va_start(ap, fmt);
  ret = vfprintf(stdout, fmt, ap);
  va_end(ap);
  return ret;
}
2. 编译得到printf.s
gcc -shared -fPIC -S printf.c -O23.修改printf.s文件,修改后完整文件内容如下:
	.file	"printf.c"
	.text
	.p2align 4
	.globl	__printf_chk
	.type	__printf_chk, @function
__printf_chk:
.LFB23:
	.cfi_startproc
	endbr64
    pushq %rbp
    movq  %rsp, %rbp
    andq  $-0x10, %rsp
    subq  $-0x8, %rsp
	subq	$216, %rsp
	.cfi_def_cfa_offset 224
	movq	%rsi, %r10
	movq	%rdx, 48(%rsp)
	movq	%rcx, 56(%rsp)
	movq	%r8, 64(%rsp)
	movq	%r9, 72(%rsp)
	testb	%al, %al
	je	.L2
	movaps	%xmm0, 80(%rsp)
	movaps	%xmm1, 96(%rsp)
	movaps	%xmm2, 112(%rsp)
	movaps	%xmm3, 128(%rsp)
	movaps	%xmm4, 144(%rsp)
	movaps	%xmm5, 160(%rsp)
	movaps	%xmm6, 176(%rsp)
	movaps	%xmm7, 192(%rsp)
.L2:
	movq	%fs:40, %rax
	movq	%rax, 24(%rsp)
	xorl	%eax, %eax
	leaq	224(%rsp), %rax
	movq	%r10, %rdx
	movq	%rsp, %rcx
	movq	%rax, 8(%rsp)
	leaq	32(%rsp), %rax
	movl	$1, %esi
	movq	%rax, 16(%rsp)
	movq	stdout@GOTPCREL(%rip), %rax
	movl	$16, (%rsp)
	movq	(%rax), %rdi
	movl	$48, 4(%rsp)
	call	__vfprintf_chk@PLT
	movq	24(%rsp), %rdx
	subq	%fs:40, %rdx
	jne	.L6
	addq	$216, %rsp
    leave
	.cfi_remember_state
	.cfi_def_cfa_offset 8
	ret
.L6:
	.cfi_restore_state
	call	__stack_chk_fail@PLT
	.cfi_endproc
.LFE23:
	.size	__printf_chk, .-__printf_chk
	.ident	"GCC: (Ubuntu 11.4.0-1ubuntu1~22.04) 11.4.0"
	.section	.note.GNU-stack,"",@progbits
	.section	.note.gnu.property,"a"
	.align 8
	.long	1f - 0f
	.long	4f - 1f
	.long	5
0:
	.string	"GNU"
1:
	.align 8
	.long	0xc0000002
	.long	3f - 2f
2:
	.long	0x3
3:
	.align 8
4:
4.编译得到so文件:
gcc -shared -fPIC -o printf.so printf.s5.最后,用我们的LD_PRELOAD替换glibc 中提供的:__printf_chk
运行命令式使用
LD_PRELOAD=./printf.so ./ctarget -q成功完成:
补充:
在其他实验gdb环境中调试时,也会发生segmentation fault:

解决方法是在gdb中启用我们的printf.so文件,就可以正确运行了:
(gdb) set environment LD_PRELOAD=./printf.so